Introduction: Plan first, then illuminate
Outdoor lighting in California has to do more than look good. It should increase safety, respect neighbors and the night sky, withstand diverse climates, and use energy wisely. Thoughtful planning prevents overlighting, reduces maintenance, and streamlines budgeting conversations without fixating on numbers. Whether you are refreshing a porch, lighting a long driveway, or reimagining a backyard, the right approach balances function, aesthetics, and code awareness. To spark ideas and see how efficient fixtures can meet these goals, review real examples of energy-efficient lights and note qualities—beam control, finish durability, color temperature—that suit your setting.
This guide will help you map your goals, choose durable, efficient fixtures, and understand cost drivers in qualitative terms. By aligning layout, optics, and controls, you can create a cohesive plan that looks great, performs reliably, and conserves energy night after night.
Step 1: Define objectives and zones
List the activities and safety needs for each area: front entry, driveway, pathways, steps, patio, side yards, service areas, and landscape features. Identify where visibility is essential and where soft, ambient light is preferable. For example, entries and steps require reliable, glare-controlled light, while garden beds benefit from low-level accent lighting. Group areas by function so you can select matching color temperatures and finishes for a unified appearance.
Consider neighbors and dark-sky principles. Shielded fixtures, precise optics, and warmer tones reduce glare and light trespass. Limit uplight to protect the night sky and emphasize downlighting where possible. Your plan should highlight what matters—pathways, thresholds, house numbers—without flooding the yard.
Step 2: Choose optics and brightness thoughtfully
LEDs enable precise beam control. For paths and steps, use wide, low-glare distributions. For entries, aim for controlled forward throw that illuminates landing areas without shining into eyes. For trees and facades, select narrow or medium beams to sculpt form without washing everything flat. Resist the temptation to overspec brightness; instead, layer small, carefully aimed lights. This strategy often yields better visibility and comfort while reducing energy use.
Color temperature shapes mood outdoors too. Warmer white is relaxing and friendly; neutral-white increases contrast on steps and textured surfaces. Keep color consistent by zone to avoid a patchwork effect. High CRI improves material appearance on wood decks, stone, and plantings.
Step 3: Durable construction and ratings
Outdoor fixtures must withstand moisture, UV exposure, and temperature swings. Wet-rated luminaires are essential in exposed locations; damp-rated may suffice under eaves. In coastal areas, corrosion-resistant materials and finishes extend life. Look for sealed housings, gaskets, and drainage features that mitigate water intrusion. Choose fixtures with robust mounting hardware and proper strain relief for wiring.
For in-ground or step lights, pay attention to load ratings, drainage, and installation depth. Avoid fixtures that create glare at eye level. Consider serviceability—can you access the driver or light engine if maintenance is needed? Selecting quality now reduces future disruptions.
Step 4: Power strategy—low-voltage, line-voltage, or solar
Low-voltage (often 12V) systems are popular for landscape lighting because they are flexible, relatively easy to install, and offer precise control. Line-voltage luminaires suit driveways, tall bollards, and security applications where higher output is needed. Solar fixtures can work well in locations with strong sun exposure and minimal wiring access, but verify battery quality and optics. Hybrid plans are common: low-voltage for gardens and paths, line-voltage for key egress points, and select solar accents where wiring is impractical.
Regardless of power type, aim for efficient LEDs with good optics. Well-designed fixtures at sensible lumen levels outperform oversized, glary lights and reduce ongoing energy consumption.
Step 5: Controls for savings and convenience
Outdoor lighting does not need to run at full intensity all night. Use scheduling, astronomical timers, and motion sensors to balance safety and energy savings. For driveways and side yards, motion activation is intuitive. For entries and patios, dimmed evening scenes that increase on approach can be both welcoming and efficient. Daylight sensors prevent daytime runtime when someone forgets a switch. Smart systems enable seasonal adjustments and vacation modes for security.
Qualitative cost planning: What drives investment
While exact numbers vary widely, certain factors predict how much a project will require. Quantity and quality of fixtures influence both initial and long-term value. Better optics can reduce the number of fixtures needed. Site complexity matters: long runs, hardscape crossings, trenching, and challenging soil increase labor intensity. Control sophistication—from simple timers to advanced, multi-zone automation—adds capability. Environmental conditions, such as coastal exposure or extreme temperature swings, may call for upgraded materials and housings.
Service access and future-proofing also play a role. Choosing systems with accessible drivers, modular components, and standard connectors can simplify maintenance. Aim for a design that meets today’s needs but can expand later without reworking the entire installation.
Codes, neighbors, and night sky
California emphasizes energy efficiency and responsible outdoor lighting. Shielded fixtures, automatic shutoff, and reasonable light levels support visibility without waste. In residential neighborhoods, keep light confined to your property and avoid aiming beams into windows or across fences. Select distributions that place light where feet land and faces look—thresholds, address numbers, and steps. Warmer CCTs outdoors can feel more comfortable and minimize glare, especially in quiet, residential streetscapes.
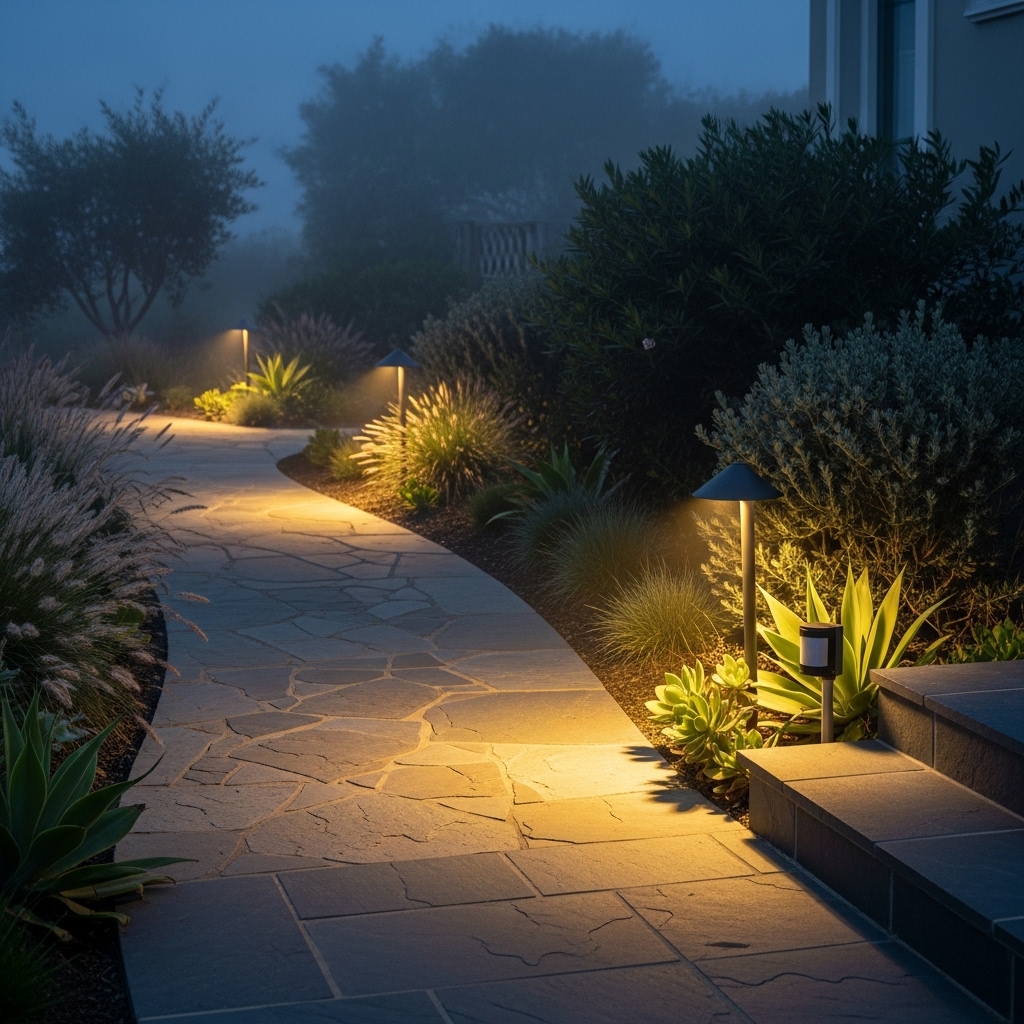
Entry, driveway, and path strategies
Entry lighting should reveal faces and surfaces without glare. Use sconces or downlights with shielding to illuminate the door and landing. For driveways, combine a modest area light with motion-activated boosts when vehicles or people approach. For paths, stagger low-level lights to create rhythm and avoid a runway effect. Steps benefit from linear tread lights or small directional fixtures that highlight nosings for safety.
Landscape accents that waste less light
Accent lighting should draw attention to features you love—trees, sculptures, textures—while preserving the calm of the night. Narrow beams for tall trees, gentle washes for walls, and silhouetting for interesting shapes can be achieved with efficient LEDs and good aiming. Hide sources from common viewpoints to reduce glare. Test at night with temporary stakes or clips to refine positioning before permanent installation.
Weather resilience and wildfire considerations
In regions prone to high winds and dust, select sealed fixtures with durable gaskets. Where wildfire safety shutoffs occur, consider layered control and battery-backed scenes that emphasize essential egress paths. Keep combustible materials clear of hot surfaces, even though LEDs run cooler than older lamps. For coastal homes, favor marine-grade finishes and non-ferrous hardware to resist corrosion.
Maintenance without headaches
Plan for access. Choose fixtures with replaceable components where possible and document transformer locations, circuit maps, and control settings. Keep spare lamps or modules for critical areas to ensure uniformity if a component fails. Clean lenses and check seals periodically; dirt and water intrusion reduce output and shorten life. Thoughtful maintenance stretches the value of your investment and keeps energy use low.
Mid-project review: Validate choices before you commit fully
Before installing the entire system, mock up key zones. Verify brightness, color, and aiming at night. Adjust fixture count and locations to eliminate glare and dark spots. If you need inspiration as you refine selections, browsing curated collections of energy-efficient lights can help you compare form factors, beam options, and finishes that suit your architecture and plant palette.
Frequently asked questions
Question: What color temperature works best outside? Answer: Warm to neutral-white is comfortable for residential use. Keep it consistent within zones. Neutral-white can improve contrast on steps, while warmer tones flatter wood and stone.
Question: Are solar path lights reliable? Answer: Quality varies. In sunny locations with quality batteries and optics, solar can work well for low-level accents. For critical egress lighting, hardwired or low-voltage systems are more predictable.
Question: How do I prevent glare? Answer: Use shielded fixtures, appropriate beam angles, and careful aiming. Place lights below eye level where possible and avoid aiming at windows or neighboring properties.
Question: Can I mix low-voltage and line-voltage lights? Answer: Yes. Many projects use low-voltage for landscape accents and line-voltage for driveways or tall elements. Keep circuits organized and follow rating and installation requirements.
Question: What maintenance should I expect? Answer: Periodic cleaning of lenses, checking seals, and verifying control settings. Document locations of transformers and connections to simplify future service.
Question: How many fixtures do I need? Answer: It depends on goals and site conditions. Emphasize quality optics and placement over sheer quantity. Testing at night before final installation avoids overlighting.
Question: Will outdoor LEDs attract insects? Answer: Warmer color temperatures and shielded optics can reduce attraction. Sealed fixtures also help prevent insect intrusion and lens clouding.
Bring your plan to life
Thoughtful outdoor lighting enhances safety, welcomes guests, and celebrates landscape features while respecting neighbors and the night sky. Start with clear objectives, choose durable, efficient fixtures, and lean on controls to save energy. When you are ready to refine ideas and align styles with performance, browse proven options for energy-efficient lights, then map out your zones, confirm optics, and move forward with confidence. The result will be a resilient, efficient, and beautiful exterior that supports California living year-round.